Cedar Care and Wet Weather

Cedar Care and Wet Weather

4 Jul 2025
Cedar care and wet weather

One of the most common questions we get asked is “Can I get my Cedar maintained in the winter?”

Absolutely! With winter, comes rain…but not as much as you might think.

At the height of the wet season, there are 19.1 rainy days in June and 20 in August. In summer, there are 14.1 rainy days in December and 9.8 days in February. That’s only 6-10 days difference.

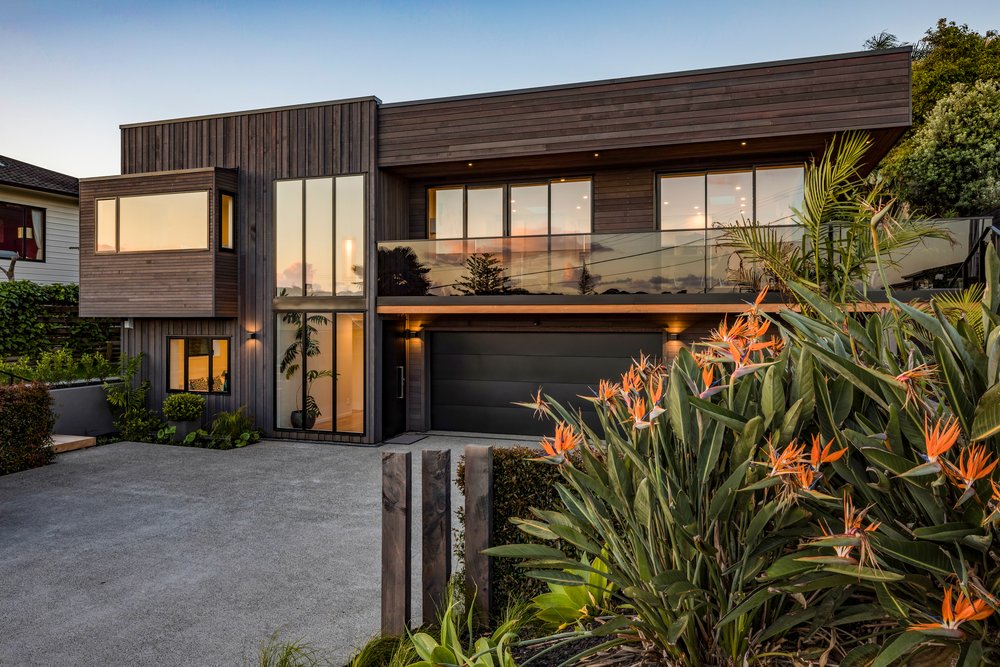
Yes, Auckland is a rainy place! But we’ve been looking after Cedar for 12 months of the year, for over 30 years, and rain isn’t as big of a problem as you might think.

This comes down to the unique properties of Cedar and how we care for it.

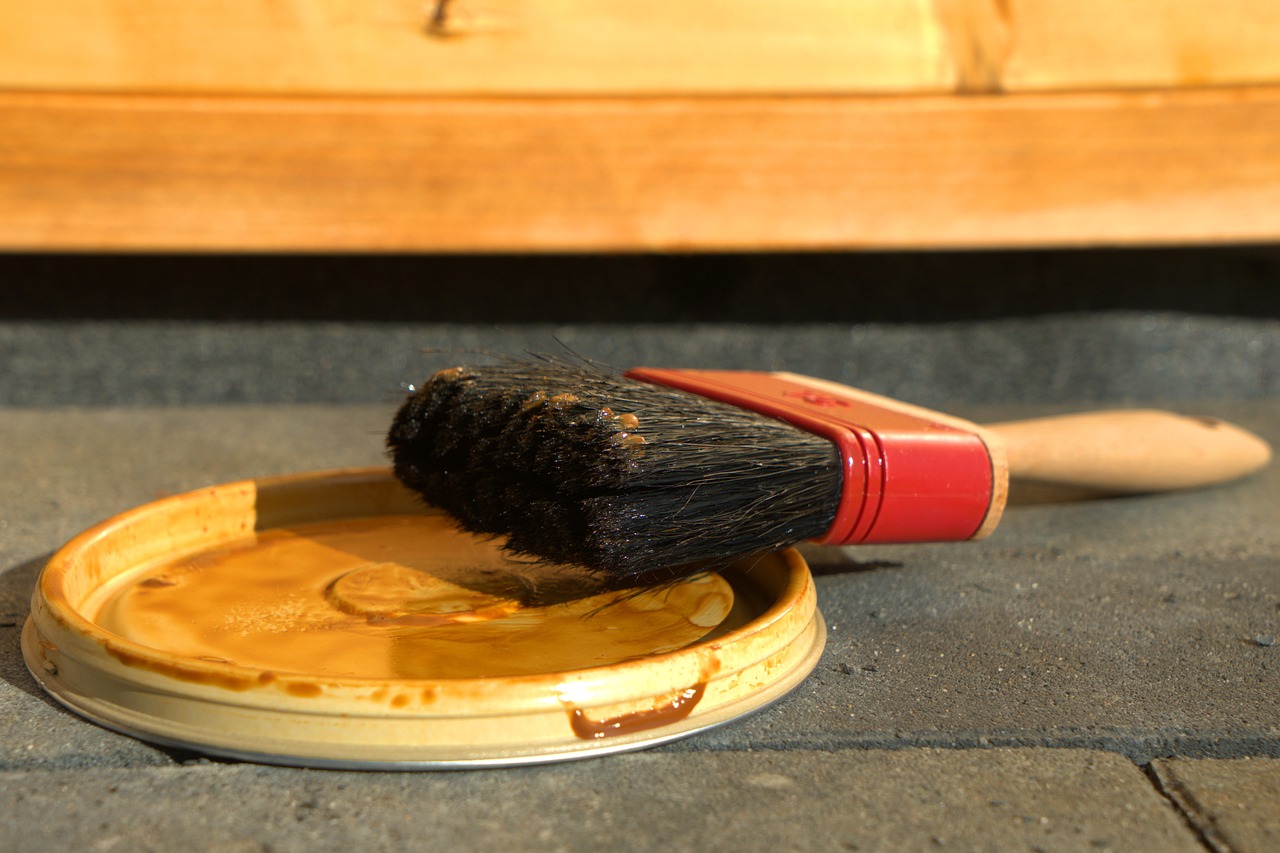
Oil and Stain Are Not Paint

The statement above may seem obvious, but the idea of paint drying is so fixed in our collective minds that people often make the comparison.

Aside from both being applied to walls, they couldn’t be more different products.

Paint is applied by building a film on the surface of another film, which then must dry and cure.

Stain and oil penetrate into the pores of the Cedar and start providing protection against moisture almost immediately.

You could even spray the boards lightly with a hose 20-30 minutes after application and it would make no difference to the finish.

How Wet is Wet?

Similarly, in most people’s minds, when a board gets wet, it is wet the whole way through. This is only what our eyes are telling us.

In truth, it’s only the surface that gets wet (usually the top 1mm), the rest of the board stays perfectly dry.

To apply a Cedar coating, we only need the surface of the board to dry out. Depending on exposure to the sun, wind and air temperature, this can happen anywhere between 5 – 30 minutes.

You can feel whether Cedar it is dry or not by touching the boards. If the surface is too wet, we simply do not apply the coating.

Mark likes to use the analogy of hanging out washing. If you are happy to put out your washing to dry, you can coat Cedar.

And if a spattering of rain does get onto the surface, the oil or stain is already working to create a barrier against moisture.

What Happens if it Does Rain?

Every morning, the Senior Technicians assigned to the job will look at the weather and work with the Production Manager to make the call. In most cases, the decision has been made the previous day.

Our scheduling team also looks at the weather in advance and plans accordingly. If rainy weather is on the way, they will book in other work such as washing or adapt the scheduled work to the conditions.

If the weather is inclement, the technicians can focus on areas of the house away from the wind and rain.

If the weather is coming from the north, we can coat the areas on the south, or undercover areas.

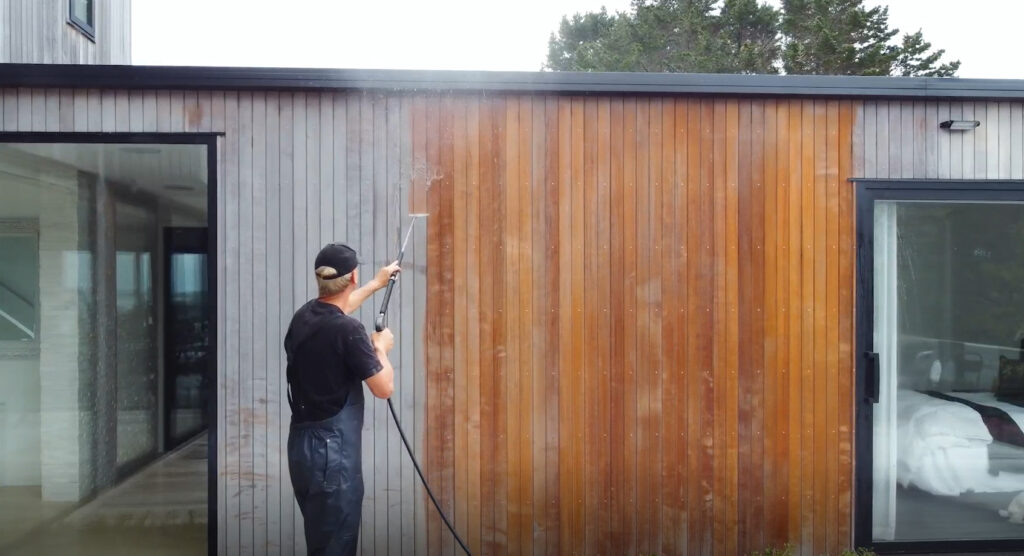
If rain is truly setting in, we can wash the Cedar in preparation for coating. During periods of persistent rain, there can be a gap of 1-2 weeks between washing and coating, but this could be left up to 6 weeks without any issues.

So, When is the Best Time to Coat?

The answer is always now. If you ask us in 6 weeks or 6 months, the answer will be the same.

We are battling the sun here, and the sun always wins. New Zealand’s harsh UV rays are constantly sucking the natural tannins from the boards and they need to be coated to protect against the wet-dry-wet effect.

If left longer than the recommended 2-3 summers, the surface can begin to roughen and create a toe-hold for mould and lichen, resulting in an unkempt look.

This isn’t scaremongering. If you leave them for another 6 months, the difference is almost indiscernible. But that doesn’t change the fact that there is no “best time” for Cedar maintenance.

The best time is always now. You just need to pick your days.

Final Thoughts

We have been doing this for over 30 years and know our way around a bit of rain.

If the boards are dry, we can coat them. Once we get to the point where the boards are wet and will not dry, we stop. Simple as that.

Don’t let the idea of rain put you off getting your Cedar maintained and protected. Winter is just as good as summer, and autumn is just as good as spring. The sun never stops and neither do we!

Read More Articles

15 Nov 2023
Let's get to the point. Is DIY Cedar maintenance possible? Absolutely. Furthermore, the process is relatively straightforward. But there are some factors to consider before attempting DIY.

Let’s get to the point. Is DIY Cedar maintenance possible?

Absolutely. Furthermore, the process is relatively straightforward.

Cedar maintenance is all about protecting the timber from the elements, most importantly, the harsh New Zealand sun. If you have a long, hot summer, the natural oils in the boards will be sucked out by the sun.

Your job is to replace the oil that the sun is extracting. Without oil replenishment, the boards will dry out over time and begin cupping.

A general DIY Cedar maintenance plan would involve soft washing your house once every few years and applying a coat of oil to sun-exposed faces every 2-3 summers.

Seems straightforward, right?

So is changing the oil on your car, but very few people have the time or are willing to get their hands dirty. The same goes for Cedar.

Here are some factors to consider before attempting DIY maintenance.

1. Convenience

We have a customer in Northland who is 83 years old and had previously maintained the Cedar on his family home for decades – and did a great job of it. Now that he can’t get up the ladder like he used to, he came to us for help.

Anybody can learn how to maintain their own Cedar, but not everybody has the inclination. Maintaining Cedar is physically demanding, often working at heights, using bulky equipment, in a wet and mucky environment.

Hiring a professional means you don’t have to worry about anything. They will bring all their own equipment, have experience working at heights and clean up after themselves, leaving nothing but a beautifully maintained house.

2. Property Access

Accessing the different areas of your house can be tricky, and potentially dangerous.

Even on a flat property, there are always parts of a house that are difficult to reach. The job gets even more complicated if the ground is uneven.

Double story house can be quite daunting. Some houses require scaffolding, but most houses can be accessed with a ladder.

If you are not comfortable working on a ladder, or the ground around your house is uneven, it is usually safer to hire a professional who is experienced working at heights.

If your house does require scaffolding, a professional Cedar maintenance company will often have their own scaffolding and manage the whole process, saving you time, headaches and money.

3. Risk of Damaging the Cedar

The surface of a Cedar weatherboard can be easily damaged. The water blaster should be set at a low pressure and moved across the boards in a steady motion without pausing.

Water blasting at a high pressure can strip away too much of the soft tissue in the timber, leaving it streaky and unsightly.

This is often when we get called, only now the customer is paying for remedial work to restore the damage rather than just maintenance.

Your home is usually your most valuable investment. By hiring a professional, you are removing the risk of damaging the timber and ultimately, adding value to your investment.

4. Preparing the Cedar for application

Cleaning and preparing the Cedar is the most important part of getting a satisfactory finish.

People can be so scared of damaging the timber, that they use a water pressure that is too low or don’t scrub sufficiently to properly clean the Cedar.

If you do not remove all the built-up organic matter, whatever you put on the surface will then be compromised.

To prepare your Cedar with a water blaster, make sure you wash it at the right pressure, or scrub the boards with an appropriate brush, making sure the boards are free of any timber fibres, oxidised tint, dirt, mould, lichen and moss.

Once all that is gone, you need to make sure any stain on the boards is evenly removed. You don’t want the boards under the soffit left a different colour.

5. Consistent application of the product

Applying a stain is simple, you move the brush from one side to the other keeping an even coverage and a wet edge.

But getting an even finish across the boards takes time and practice. If the stain dries before you finish, there will be lines in it.

We have also seen DIY oiling attempts that only go 3/4 of the way up the wall because they couldn’t reach any higher, or thought the Cedar was protected by the soffits of the house.

Trying to blend that in after the event is very difficult and always ends up costing more in the long run.

Thinking Twice About DIY?

Anyone can learn how to maintain their Cedar, but it probably looks easier than it is and is fraught with little problems that when added together, become bigger issues.

If you require expert advice, call us on 0800 298 298. Our friendly team is always ready to help.

17 Oct 2023
Many Cedar homes that were built before the 2000s have a distinctive red colour than now looks dated. At the time, the red/brown tint was all that was available, but now we have access to a wide range of tinted oils and stains.

Most Cedar homeowner aren’t aware that they can change the colour of their Cedar. It usually comes about in our initial conversation with new customers who have just bought their home and want a more contemporary look.

Many Cedar homes that were built before the 2000s have a distinctive red colour than now looks dated.

At the time, the red/brown tint was all that was available, but now we have access to a wide range of tinted oils and stains.

What colours we recommend depends on the unique circumstances of each house: the existing colour of the Cedar, levels of UV exposure, whether the Cedar is treated with an oil or a stain, and when the Cedar was last maintained.

Before talking colours, it’s useful to understand how Cedar works in relation to oils and stains.

How Cedar Works

Raw Cedar can be a myriad of colours, anything from light pine to mahogany red.

There is a lot of red Cedar around. If you cut it in half, the inside is a deep red colour. Add oil to that and the red pops out, making it a difficult base colour to compete with. But more on that later.

Once the Cedar has been used in construction, an oil or stain is applied to protect it from the elements and give a cosmetic finish.

A tint is a pigment added to an oil or stain. This is like how pigment is added to paint. To create a pastel colour, you start with a white base, add the pastel pigment and blend it together to get the final colour.

It’s the same principal for stains and oils.

Assessing Your Colour Options

The more drastic the change of colour, the more difficult the process will be.

If you have a natural Cedar colour, which is less red and more of a brownish hue, it can be covered with a dark brown or black quite easily.

If you have deeper colours such as dark red, changing the colour becomes more difficult.

For a lighter or muted finish, you would need to scrub off some of the deep red. If you are going for a brown or black finish, you need to put on more of the next coat to hide the red that is underneath.

Changing from dark to light will also be more expensive, as the initial colour will need to be stripped back and is a much more intensive process.

Changing Colour with Oils

When an oil has already been applied, the tint will often need to be stripped from the surface using a degreaser. Because oils are translucent, they work with the colour underneath, which is generally the red Cedar.

If you don’t use a degreaser, you are working with the already pigmented Cedar and no matter how many coats you put on, it won’t make a difference.

The extent of this process depends on how much UV the treatment has been exposed to.

If the oil has been exposed for 4 or 5 summers, the tint will have oxidised and broken down, and will most likely come off with a heavy wash. If it’s only been on for 1 or 2 summers, chances are the sun hasn’t broken it down and it will need a degreaser.

If there are parts of your house that are protected from the UV, such as under soffits, we treat those areas separately to achieve an even finish.

Changing Colour with Stains

The underlying principle behind changing the colour on an oil or a stain is basically the same: you first need to remove as much of the original finish as possible to create the best results.

If any of the original colour remains, the oil or stain highlights whatever is left on the board.

Stain is opaquer than oil and hides a lot more. If you are going from light brown to dark brown, or red to dark brown, you can probably get away with a standard wash and 2-3 coats of stain. For more drastic colour changes, you will need to use a paint stripper.

Modern paint strippers are less potent than in the past and are made from organic compounds that are brushed on the surface, then scraped off and put in the rubbish bin.

Want a Modern Look for Your Home?

As you can see, there are a lot of different factors that need to be considered when looking to change the colour of your home.

To learn about your options, give us a call on 0800 298 298. One of our Cedar experts will visit your home and assess your timber.

If you want to browse colours, please visit our Colour Range page and look at some swatches.

12 Aug 2023
What debate? Oil is the way to go when it comes to cedar, no contest. While stain only coats the surface of the wood, oil works in partnership with one of cedar’s basic features. You see, cedar is a naturally oil-rich timber itself – it soaks up rejuvenating oil deep into its cells for up to a year after it’s applied.

“Should I use oil or stain on my Cedar?”

This is by far the most common question we get from Cedar homeowners and a source of some debate on the internet.

In our opinion, there is no debate (with a few caveats). For nearly all situations, treat Cedar with a penetrating oil such as Wood-X.

Oil works like moisturiser for Cedar, deeply replenishing the natural oils and keeping the Cedar protected – and looking great – for many years to come.

So, there we have it, debate closed. Oil is the way to go when it comes to Cedar, no contest. But if the answer is so clear cut, where does this debate come from in the first place?

To find out, read the full article, or watch the video below for a quick summary.

With Cedar, Location Is Everything

If we were having this conversation in the northern hemisphere, the answer would be the opposite: use a stain. Stains last longer and you will have a lot less maintenance over the lifetime of the Cedar.

In New Zealand, the situation is very different. We have some of the harshest UV rays in the world which extract the natural oils from the Cedar and dry out the boards. Over time, the boards will cup and eventually crack, leading to a costly replacement of your cladding.

Stains protect the boards from moisture and look great, but unlike penetrating oils, they do not replenish the natural oils extracted by the sun. They are designed to erode over time, often unevenly, and leave the timber unprotected and unsightly.

Caveats For Using Stain on Cedar

While oil is recommended for Cedar in nearly all cases, there are some situations where stain is more suitable.

If the Cedar has considerable shade with little to no UV exposure, using a stain instead of an oil might be appropriate. This is usually when a house is shaded by dense tree cover or has wide soffits, such as villas where the roof extends over the porch.

The soffits stop the weatherboards from being degraded by the sun. These well protected areas can be treated with a stain and will look great forever.

If in doubt, get in touch, we are always happy to give an expert opinion on which treatment is best for any given job.

Comparing Costs Between Cedar Oils and Stains

Over the long term, there isn’t much difference in maintenance cost between oils and stains. The real savings come when looking at the longevity of the Cedar boards over the lifetime of your home.

Stained Cedar will dry out in the sun, causing the boards to cup and warp faster, and increase the likelihood you will need to replace your boards. A costly solution to an avoidable problem!

The difference shows up when we’re preparing Cedar for restoration. Sanding stain may reveal unsuspected insect, sun or moisture damage. With an oil recoat on a well-maintained property, it’s just a gentle clean with a bio-degradable wash, a short drying period and the re-oiling itself.

Have any more oil vs stain questions? Send us a message or use the Live Chat below!

Read More Articles

Showing 1 - 10 of 15

Subscribe

Sign up to our quarterly newsletter for all the latest Cedar tips and expert advice.